Newshosting DNS Troubleshooting Guide
Resolve DNS server issues effortlessly with Newshosting’s secure DNS troubleshooting guide.
30 Day Money Back Guarantee

Available for:

Resolve DNS Server Problems Quickly
DNS (Domain Name System) is vital for the Internet, translating domain names like "example.com" into the IP addresses your computer uses to identify each other. However, when DNS server issues arise, it can disrupt your entire Internet experience. From slow browsing to being unable to access websites, knowing how to troubleshoot these problems is essential. With Newshosting’s secure DNS servers, you can swiftly address these issues and ensure a reliable connection.
Common DNS Issues and How to Fix Them
DNS server issues are often the root cause of Internet connectivity problems. Understanding these issues and knowing how to address them is crucial for maintaining a smooth online experience and avoiding data breaches. Below, we outline some of the most frequent DNS server problems and provide you with the steps to fix them using Newshosting’s secure DNS.

DNS Troubleshooting Tips for Various Operating Systems
No matter what device or operating system you’re using, DNS troubleshooting with Newshosting's secure DNS servers is straightforward. Here’s a quick guide on how to troubleshoot and resolve DNS issues on different platforms:
Check DNS Server Settings
The initial step in troubleshooting DNS issues is to check that your DNS server settings are accurate. Incorrect settings can hinder your computer's ability to resolve domain names properly, resulting in an unstable or non-functional Internet connection.
-
Open Network Connections:
- Right-click the network icon in the system tray and select "Network & Internet settings."

-
Scroll down and select Advanced network settings.

-
Check Properties:
-
Select Your Network:
- Click on your active network connection (Wi-Fi or Ethernet).

- Ensure "Use the following DNS server addresses" is checked and enter Newshosting DNS servers (if provided)
-
Select Your Network:
-
Open Terminal:
- You can find it in Applications > Utilities.
-
Check DNS settings
-
Run the command:

-
View the results
- Look for the DNS servers listed under "Resolver".
-
Run the command:
-
Open Terminal:
- Right-click the network icon in the system tray and select "Open Network & Internet settings."
-
Check DNS settings
-
Run the command:

or, if your system uses resolv.conf, check it by:

View the results
- This will display the DNS servers your system is using.
-
Run the command:
-
Open Settings
-
Tap on your Wi-Fi or mobile network.
Tap on the network
- For Wi-Fi, long press on the connected network and select "Modify network".
-
Tap Advanced options.

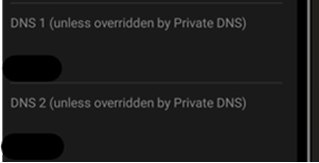
Check IP settings
- You may need to scroll down to see DNS settings
-
Look for "IP settings" (set to DHCP or Static), where DNS servers will be displayed.
-
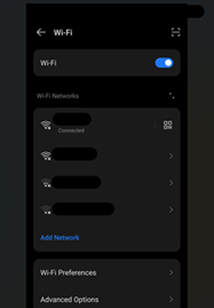
Tap on your Wi-Fi or mobile network.
-
Open Settings

-
Go to Wi-Fi
-
Tap on the connected Wi-Fi network.
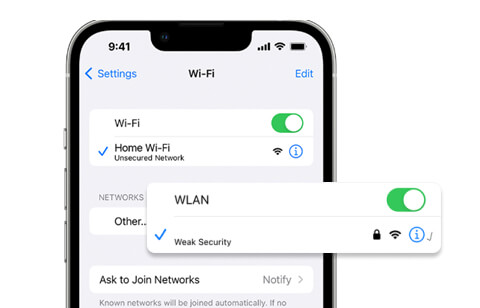
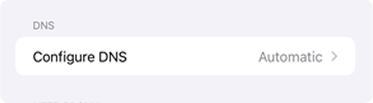
Scroll down to DNS
-
You will see the DNS servers listed. If set to Automatic, they may be obtained from the router.
-
Tap on the connected Wi-Fi network.
-
Testing DNS
-
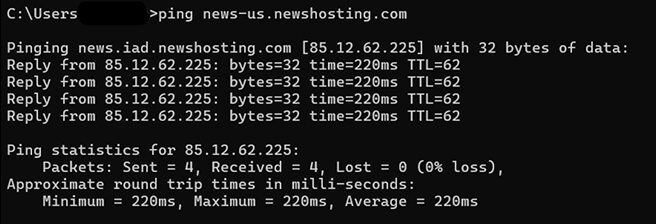
To test DNS functionality across all platforms, you can use the ping command
(or a web browser) to check connectivity to a known domain, like:

- If you receive responses, your DNS is functioning correctly.
-
To test DNS functionality across all platforms, you can use the ping command
(or a web browser) to check connectivity to a known domain, like:
Step-by-Step Guide to Fixing Common DNS Issues

Using Newshosting’s built-in Usenet search offers a range of advantages, making your experience more efficient and enjoyable:
DNS issues can occasionally arise from an outdated or corrupted DNS cache on your device. Flushing the DNS cache can help resolve these problems by prompting your device to retrieve the most current DNS information.
Windows 10 and 11-
To flush the DNS cache, open your command prompt or terminal and enter the following command:

-
Check Connectivity
- Ping the server to ensure it’s reachable:

-
Check Connectivity
- Ping the server to ensure it’s reachable:
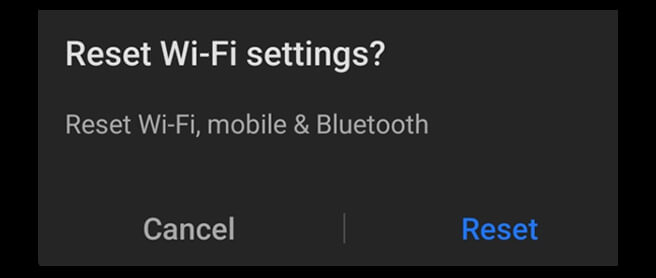
- Restart Your Device: The most effective way to clear the DNS cache on an Android device is to restart your phone or tablet. This simple action typically clears the DNS cache and resets network settings.
- Reset Network Settings: If a restart does not resolve the issue, you can reset the network settings to clear the DNS cache
-
Navigate to Settings > System > Reset Options.

- Select Reset Wi-Fi, mobile & Bluetooth.

- Confirm by tapping Reset Settings
- Utilize a DNS Cache Flush App: There are various applications available on the Google Play Store that can assist in clearing the DNS cache. Look for options such as "DNS Changer" or "DNS Flusher," which explicitly state their capability to clear the DNS cache.
-
Toggle Airplane Mode: One of the simplest methods to clear the DNS cache on an iOS device is to toggle Airplane Mode on and off:
- Open the Control Center by swiping down from the top-right corner (or up from the bottom on older devices).
- Tap the Airplane Mode icon to enable it.
- Wait a few seconds, then tap it again to disable it.

-
Restart Your Device: Restarting your iPhone or iPad can also effectively clear the DNS cache:
- Press and hold the Side button along with either Volume button until the power-off slider appears.
- Drag the slider to turn off your device.
- Once the device is off, press and hold the Side button again until the Apple logo.appears

-
Reset Network Settings: If toggling Airplane Mode and restarting do not yield results, consider resetting the network settings:
- Go to Settings > General > Reset.

- Tap Reset Network Settings
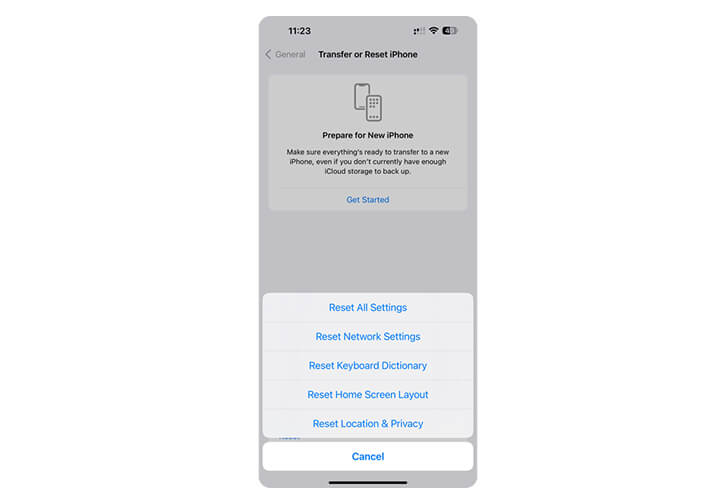
- Enter your passcode and confirm the reset.

Why Newshosting’s Secure DNS is the Best Choice
Newshosting’s secure DNS servers not only fix DNS server issues but also provide enhanced online security. With our robust DNS servers, you can enjoy a seamless, fast, and secure browsing experience, protected from threats like phishing and malware.
Get Started
Need Help? Contact Newshosting Support
If you're still experiencing DNS issues or have any questions about setting up your secure DNS, don't hesitate to reach out to Newshosting's expert support team. We're here to help you resolve any problems and ensure your connection stays fast and secure. Contact us anytime for personalized assistance, and we'll get you back online in no time.
Contact Support